![]()
digital_________negatives
- Download handout here
- Scroll down for specific processes: Cyanotype, VanDyke, Palladium, and Silver Gelatin contact printing
DIGITAL NEGATIVES: A COMPILATION
One of the most important steps in making a digital negative is creating a good file to work with.
An inferior digital image will result in an inferior digital negative. A picture that does not look
perfect in Photoshop will not look any better in your designation process by applying a process
specific correction curve.
Bit Depth is important:
Always try to work with a file that is the largest bit depth possible, since the correction curves for
the various processes push your pixels around very radically. The more information you have in
your image, the less posterization will happen in you final negative/print.Ideally, if you are starting with a color file, it will be in 48 bit (16 bits per channel). B&W = 16
bit. If your file is in a lower Bit Mode, go to IMAGE>MODE and convert it to a higher bit file.
While this does “make up” information – it can help make smoother transitions in your final digital
negative.
Image Adjustments:
Color Files:
1) Begin with a 48 bit color file, make it look as good as possible, IN COLOR, before
to 16 bit B&W. This means make sure you have the correct density and
contrast, that your colors are corrected.2) Once it looks great in color, add a B&W Adjustment Layer. Play around with the sliders
until you get a B&W image that you like. Be careful not to clip you highlights or shadows
(you can visualize this by having the Histogram palette open while you are playing with
the sliders. Click on the “!” to refresh the Histogram preview.3) AFTER converting the image to B&W you can then tweak it to create a perfect B&W
image. This means you can add a contrast Curve, Dodge and Burn, do local correction
using masks, etc. Shape it into the best B&W image that you can. I highly suggest
digitally printing out your B&W image before turning it into a digital negative so that you
have a reference image.
B&W Files:
1) Scan in 16 bit.
2) Tweak your file in Photoshop to create a perfect B&W image. This means you can add a
contrast Curve, Dodge and Burn, do local correction using masks, etc. Shape it into the
best B&W image that you can. I highly suggest digitally printing out your B&W image
before turning it into a digital negative so that you have a reference image.
Once you have gone through these steps to create a beautiful B&W image in Photoshop, you are
ready to turn your file into a digital negative for contact printing.
*****Try to always print on an EPSON R2880 printer for consistency.******
CYANOTYPE:
Print your negative on Pictorico OHP material. Use the B&W Driver and MATTE or PHOTO
BLACK INK. Just be consistent, use one or the other.
1) Open your file in Photoshop – make sure it is in 48 bit color or 16 bit grayscale
2) Create a Curves adjustment layer. Make sure you have the adjustment curve from our
website downloaded and saved somewhere (cyanotype.acv)3) Load the adjustment curve into Curves. Use the pull down menu from the upper right
hand side.4) Create an Invert Adjustment layer
5) Go to Image>Image Rotation>Flip Horizontal
6) Print to the Epson R2880 using the B&W Driver and use the Super Photo Output
resolution setting
NOTE: Your exposures will be in the 15 min range. Use an acid 1st wash bath to increase
midtones (decrease contrast).
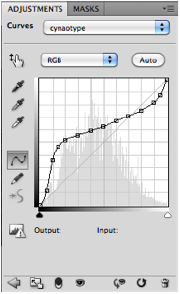 Click image to download curve
(source: CD from the Dan Burkholder book "Making Digital Negatives for Contact Printing")
VANDYKE:
Print your negative on Pictorico OHP material. Use the B&W Driver and MATTE BLACK INK.
Tony Gonzalez Method (Density)
1) Open your file in Photoshop – make sure it is in 48 bit color or 16 bit grayscale
2) Create an Invert Adjustment layer
3) Create a Curves adjustment layer. Make sure you have the adjustment curve from our
website downloaded and saved somewhere (TG-VanDyke-curve.acv)4) Load the adjustment curve into Curves. Use the pull down menu from the upper right
hand side.5) Go to Image>Image Rotation>Flip Horizontal
6) Print to the Epson R2880 using the B&W Driver and use the Super Photo Output
resolution setting
NOTE: When you are printing - make a Test Strip in 1 minute increments – even 30 sec increments can make a big difference
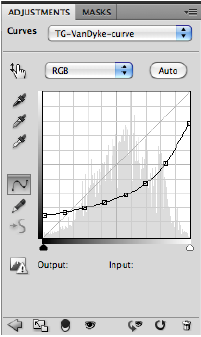 Click image to download curve
(Modified from source: Prof. Tony Gonzalez's PDF "SINGLE NEGATIVE WORKFLOW 2012")
PALLADIUM:
Print your negative on Pictorico OHP material. Use the B&W Driver and PHOTO BLACK INK.
1) Open your file in Photoshop – If it is in grayscale, go to Image>RGB to put in RGB
2) Make sure it is in 48 bit color
3) Create a Curves adjustment layer. Make sure you have the adjustment curve from our
website downloaded and saved somewhere (palladium.acv)4) Load the adjustment curve into Curves. Use the pull down menu from the upper right
hand side.5) Create an Invert Adjustment layer
6) Go to Layer > New Fill Layer > Solid Color
7) When the dialog box pops up, change the MODE to COLOR
8) When the color picker pops up, type in C=0, M=55, Y=55, K=0 and click OK
9) Go to Image>Image Rotation>Flip Horizontal
10) Print to the Epson R2880 using the Premium Glossy Photo Paper settings and use the
Super Photo Output resolution setting
NOTE: Your exposure times may be in the 10-15 mins range depending on density. Make a test
strip.
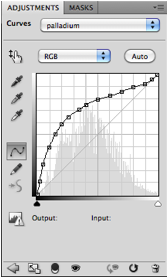 Click image to download curve
(source: Professional Photographer Magazine article about digital negatives by Dan Burkholder)
DIGITAL NEGATIVES FOR SILVER GELATIN CONTACT PRINTING:
Print your negative on Pictorico HIGH GLOSS WHITE FILM material. Use the B&W Driver and
MATTE BLACK INK.
1) Open your file in Photoshop –
2) Make sure it is in 16 bit B&W
3) Create a Curves adjustment layer. Make sure you have the adjustment curve from our
website downloaded and saved somewhere (silver-gelatin.acv)4) Load the adjustment curve into Curves. Use the pull down menu from the upper right
hand side.5) Create an Invert Adjustment layer
6) Go to Image>Image Rotation>Flip Horizontal
7) Print to the Epson R2880 using the B&W Driver and use the Super Photo Output
resolution setting
NOTE: When printing in the darkroom start with a #4 Filter and move up or down. When you move from a #4 to a #3 ½ your time will change - make a test strip. An 8”x10” print will typically take about 30 seconds to expose properly.
 Click image to download curve
(source http://digital-negatives.com/)
![]()